Tutorial - Apache Storm
Introduction
Apache Storm is generally used to perform real-time calculations related to big data (continuous calculation, involving unbounded data sources handled in a streaming manner).
Storm allows to run “topologies” (graphs of computation) on a “storm cluster”.
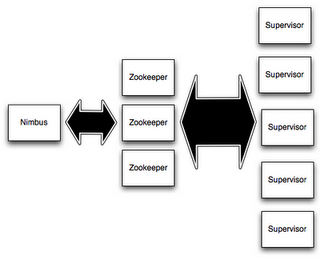
A storm cluster is made of several nodes, including:
- A master node, called Nimbus.
- Slave nodes, called supervisor nodes or workers (in fact, workers, that do the real computation, are running on supervisor nodes).
- Coordination nodes, based on Apache Zookeeper.
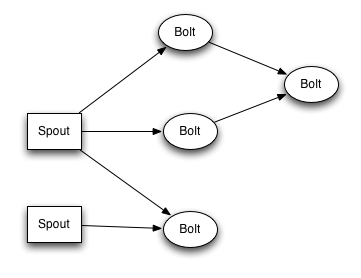
A storm topology (the graph of computation) is a kind of real-time computation “stream”. Data tuples are exchanged between computation units, called “spouts” and “bolts”. Spouts are unbounded sources of tuples (they provide data), and bolts issue tuple transformations (they perform calculations).
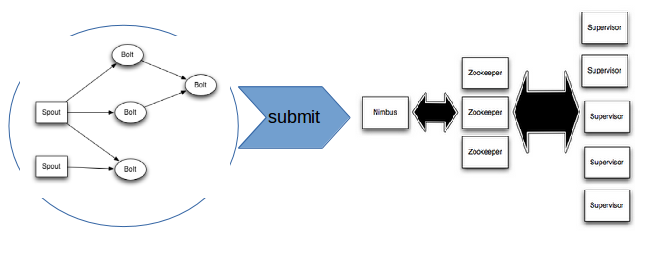
Storm topologies are packaged in a jar file, which is then submitted to the Nimbus node (the master node of the storm cluster).
Then, Storm distributes the computation units (spouts and/or bolts) on the cluster “worker” nodes.
In this tutorial, we will use Roboconf to deploy a storm cluster on multiple VMs (in fact, on multiple Docker containers - but switching to IaaS VMs is merely a configuration issue).
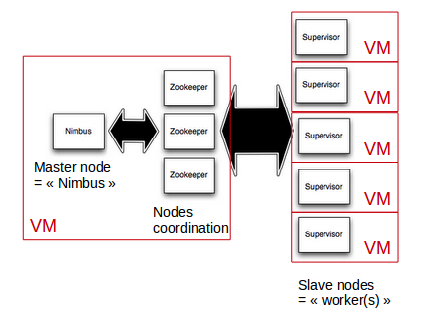
Roboconf graph for Storm clusters
Let’s make it simple: we will consider 2 kinds of nodes, called Nimbus (the master node) and Worker (a slave node).
The Nimbus node will embed an instance of ZooKeeper (nodes coordination) and StormUI (Storm’s web-based management console).
Both Nimbus and Worker nodes will provide a storm platform (each one with a specific configuration), and the processes will be run under supervision using supervisor.
A Worker node needs to know the IP address of the Nimbus node, in order to complete its configuration before starting.
This is a runtime dependency, that must be resolved before starting the node.
So, to sum up:
- Nimbus has storm + supervisord + ZooKeeper + StormUI
- A Worker has storm + supervisord
- Each kind of node has specific configuration files for all software components deployed on it
- There is a runtime dependency between Nimbus and Worker(s) - each Worker needs the Nimbus IP address.
In this tutorial, we decided to design the Roboconf graph as follows:
- A “storm_platform” component is a container for Nimbus and Worker: it provides the Storm + supervisord software stack, without configuration.
- A “storm_worker” component is an application to be deployed on a “storm_platform” (here, mainly configuration files). It imports the IP address of the Nimbus node, and will be able to complete its configuration and start up as soon as the Nimbus IP is known.
- A “storm_nimbus” component is an application to be deployed on a “storm_platform” (configuration files + additional software, including StormUI and ZooKeeper). It exports its IP address, so that other components may use it (here, “storm_worker” instances).
- A “VM” is the virtual machine where other components can be deployed (we’ll use Docker containers, but switching to a IaaS is quite easy - just adapt the “target.properties” configuration file with adequate credentials).
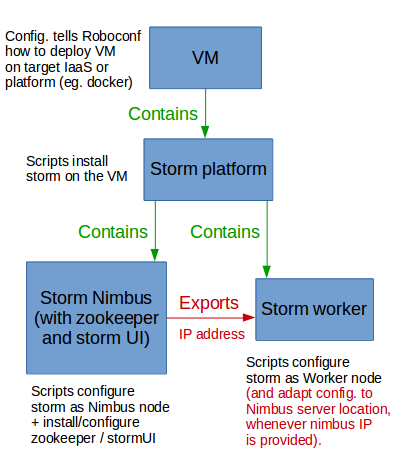
Which is equivalent to this graph definition:
# The VM
VM {
	installer: target;
	children: storm_platform;
}

# Storm base platform
storm_platform {
	installer: script;
	children: storm_nimbus, storm_worker;
}

# Storm nodes

# Storm master node (Nimbus, along with zookeeper + stormUI)
storm_nimbus {
	installer: script;
	exports: ip;
}

# Storm worker (slave) node
storm_worker {
	installer: script;
	imports: storm_nimbus.ip;
}
Download and build the tutorial
The roboconf examples can be download from Github:
git clone https://github.com/roboconf/roboconf-examples.git
Then, go in the roboconf-examples/storm-bash directory: the tutorial’s resources are there.
To build it using Maven:
mvn clean install
The Roboconf deployment archive is the ZIP file located in the target/ directory (e.g. storm-bash-0.5.zip).
Project organization
src/main/model
├── descriptor
│   └── application.properties
├── graph (The application graph is what Roboconf deploys).
│   ├── graph.graph
│   ├── storm_platform (The Apache storm software platform, without configuration)
│   │   ├── files
│   │   └── scripts (Lifecycle scripts, to be called by Roboconf).
│   │       ├── deploy.sh
│   │       ├── start.sh
│   │       ├── stop.sh
│   │       ├── undeploy.sh
│   │       └── update.sh
│   ├── storm_nimbus (The Storm master node, to deploy on storm_platform: brings ZooKeeper and StormUI).
│   │   ├── files (Configuration files for Storm and zookeeper).
│   │   │   ├── nimbus.cfg
│   │   │   ├── storm.yaml
│   │   │   └── zoo.cfg
│   │   └── scripts (Lifecycle scripts, to be called by Roboconf).
│   │       ├── deploy.sh
│   │       ├── start.sh
│   │       ├── stop.sh
│   │       ├── undeploy.sh
│   │       └── update.sh
│   ├── storm_worker (A Storm slave node, to deploy on storm_platform: mostly configuration).
│   │   ├── files (Configuration files for Storm).
│   │   │   ├── storm.yaml
│   │   │   └── worker.cfg
│   │   └── scripts (Lifecycle scripts, to be called by Roboconf).
│   │       ├── deploy.sh
│   │       ├── start.sh
│   │       ├── stop.sh
│   │       ├── undeploy.sh
│   │       └── update.sh
│   └── VM (The VM where to deploy Storm: here, configured for Docker).
│       └── target.properties
└── instances (An initial set of instances, ready to deploy with Roboconf).
    └── initial.instances
Prerequisites
Install the messaging server (RabbitMQ) and the Roboconf DM.
You may have already done this in the getting started with Roboconf.
Docker will also be necessary (unless you reconfigure the tutorial to use another IaaS).
For details, see Roboconf tips for Docker.
Then, start the DM, and make it aware of Docker: open the DM’s interactive mode and type in…
# Here in version 0.5
bundle:install mvn:net.roboconf/roboconf-target-docker/0.5
bundle:start <bundle-id>
Now, you can chech that everything is up and running by connecting to the Roboconf web admin:
http://localhost:8181/roboconf-web-administration/index.html
Deploy the Storm tutorial with Roboconf
- Load the zip archive you build in storm-bash/target, as a new application.
- Browse the instances to deploy, and deploy/start VMs and underlying components